
The Publication Workbench is a separate window in Sensitify Studio for figures that combine several experiments: calibration curves, Randles–Ševčík analyses, Tafel slopes, dose-response curves, and group comparisons. The main Studio window handles one experiment at a time. Figures export to PDF, PNG, or SVG.
Open the Workbench
The Workbench button at the right edge of the tab-bar row, above the plot, opens the Workbench in a new window. Studio stays running behind it.
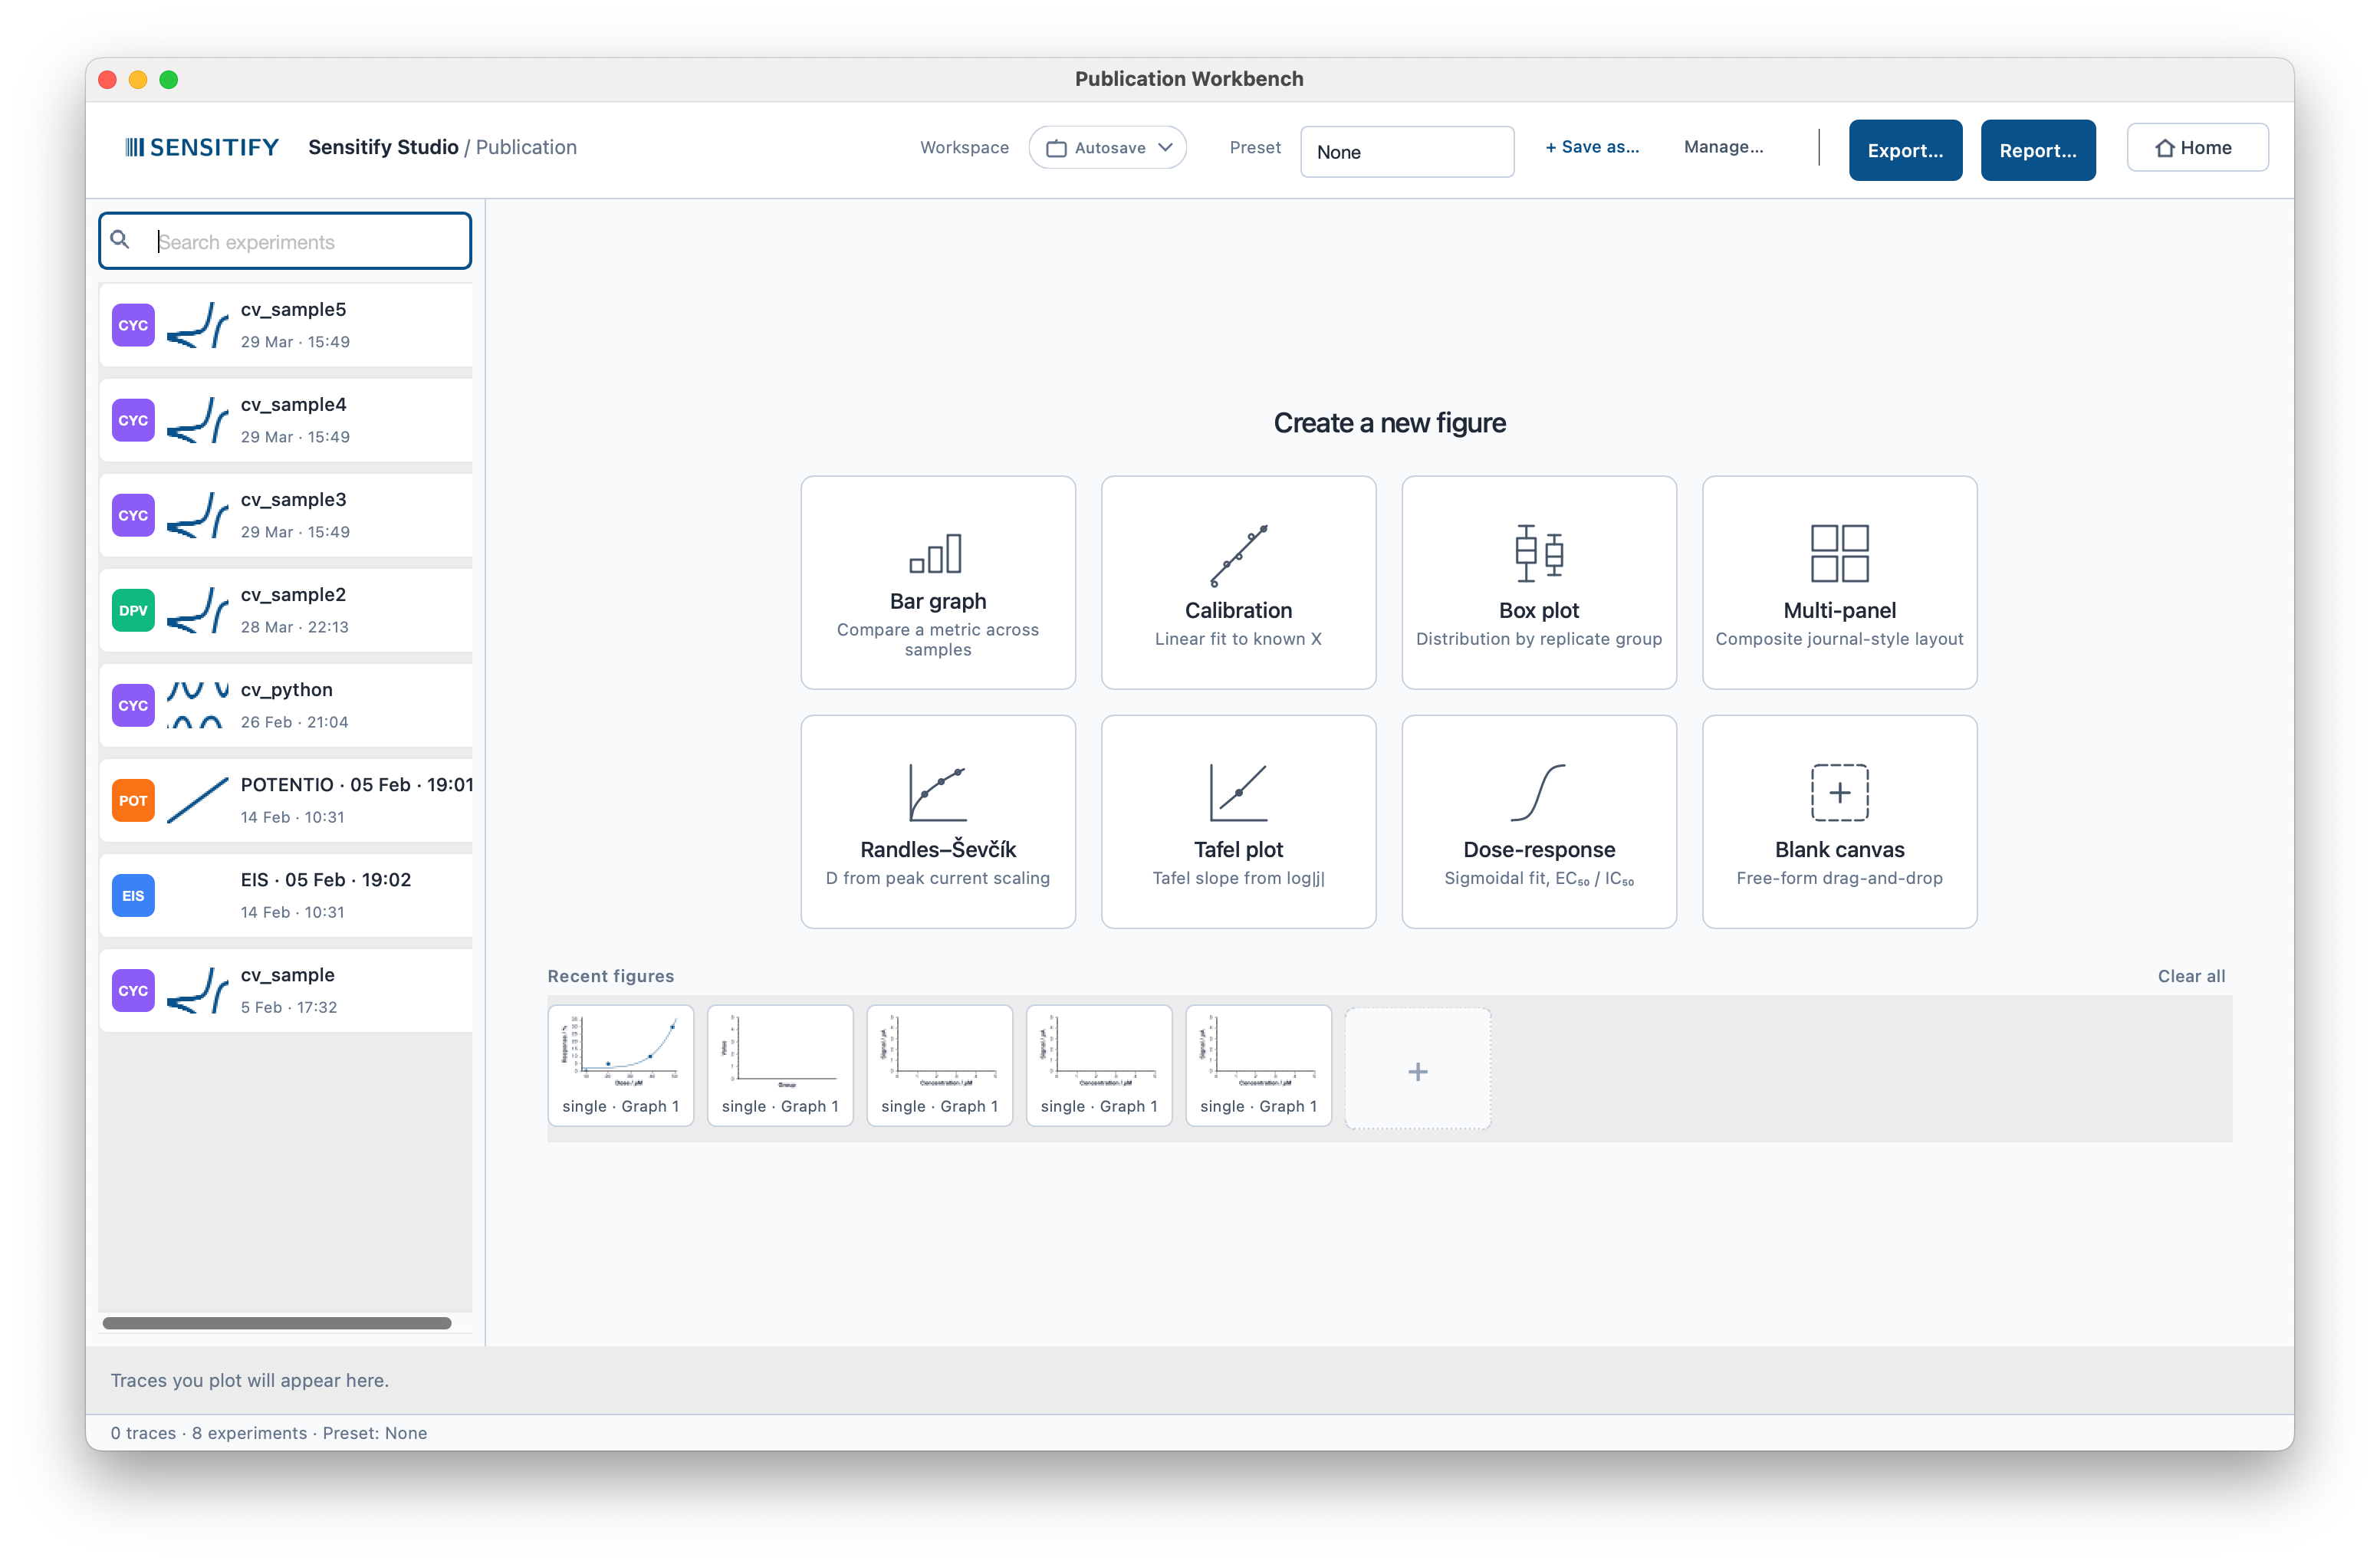
The window at a glance
- Top toolbar. Workspace and Preset selectors, Save as… / Manage… for the active preset, Export, Report, and a Home button back to the main Studio window.
- Left rail. Every experiment in the current workspace, tagged by technique. Cmd/Ctrl-click to multi-select; drag experiments onto a figure or right-click to start an analysis from the selection.
- Centre. The welcome card grid when no figure is open, the figure canvas while you work, and a Recent figures strip at the bottom for quick re-entry.
- Right inspector. Style controls: scatter colour and size, fit-line width, confidence band opacity, marker visibility, font and size, log-axis toggles.
- Bottom status line. Trace and experiment counts and the active preset name.
You can launch an in-canvas analysis from three places: the
header + Calibrate / + Tafel buttons, the welcome card
grid, or the library right-click menu.
In-canvas analysis modes
An analysis mode replaces the left rail with a data editor while the canvas shows the figure. The fit re-runs after every edit.
Each mode has the same parts:
- A data table (include, label, X, Y) with a
From experiments/Manual entrytoggle, paste from the clipboard, and CSV / TSV import. - A fit and statistics panel that recomputes after every edit.
- Validation messages. Yellow warnings allow you to continue; red messages block Done.
- Undo with Cmd/Ctrl + Z, inside the mode.
- Named presets per mode (
Save as…/Manage…), so a recurring setup can be reloaded. - An Inspector panel on the right for figure styling.
Calibration
Linear regression of concentration (X) against measured signal
(Y). Reports slope, intercept, R², RMSE, LOD (3.3 σ_blank /
|slope|), and LOQ (10 σ_blank / |slope|). Type a measured
signal into the Predict: field and the Workbench
back-calculates the concentration with a 95 % prediction
interval. A concentration unit picker (nM / µM / mM / M / mg·L⁻¹ / ppm / ppb) sets the axis label, slope unit, LOD
unit, and predicted-concentration unit together.
Replicate rows (same concentration, different Y) collapse to
one mean point with an SD error bar on the plot, but every
replicate is used in the fit so the degrees of freedom stay
correct. Rows labelled blank (case-insensitive) feed σ_blank
automatically; the intercept SE is the conventional fallback.
Outliers (residual > 2 σ) get an orange marker. The Workbench
does not exclude them automatically.
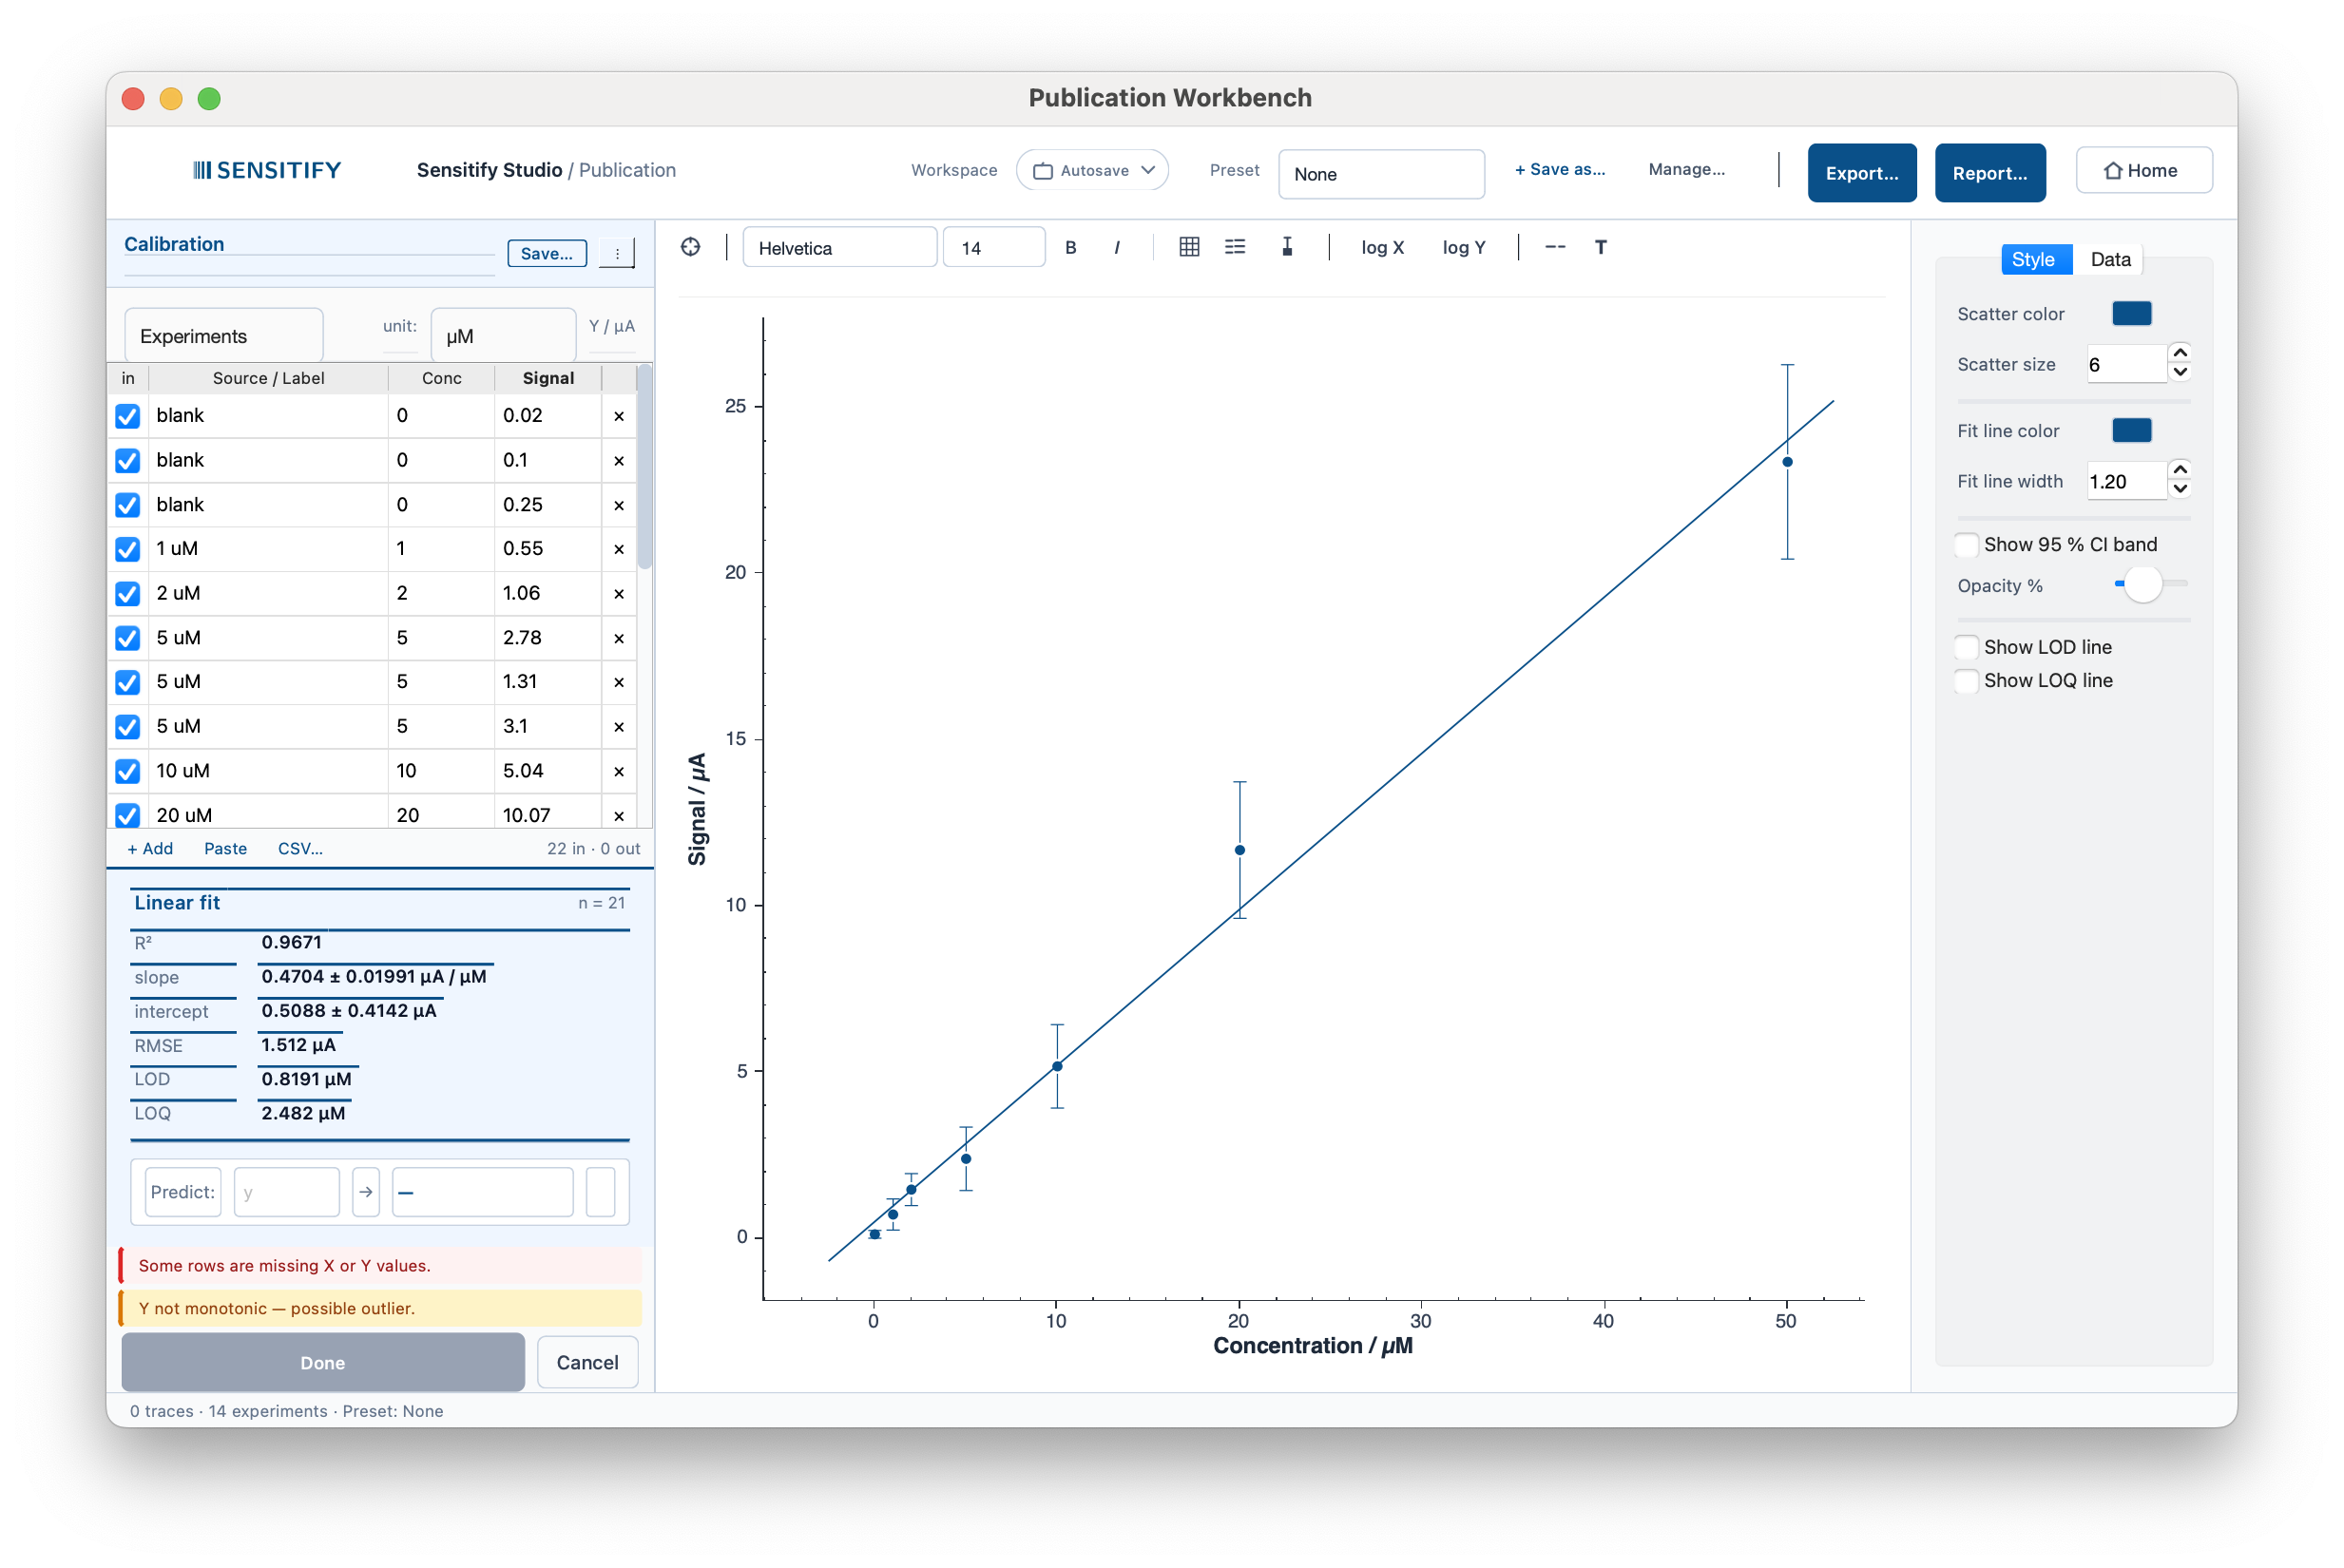
A dopamine MIP biosensor calibration by DPV, 0–50 µM linear
range with three blanks and a triplicate at 5 µM. Slope ≈
0.50 µA/µM, R² ≈ 0.9999, LOD ≈ 0.16 µM. The triplicate
collapses to one mean point with an SD error bar, and σ_blank
is read automatically from the three rows labelled blank.
Randles–Ševčík
Cyclic-voltammetry scan-rate analysis. The Workbench plots
|i_p| against √ν, fits a line, and solves the Randles–Ševčík
equation for the diffusion coefficient D in cm²/s, with unit
conversion (X in V/s or mV/s, Y in nA through A). The standard
error is propagated through the calculation.
Spinboxes for n (electrons), A (electrode area), C (bulk concentration), and T (temperature) are in the editor. Changing any of them re-runs the fit.
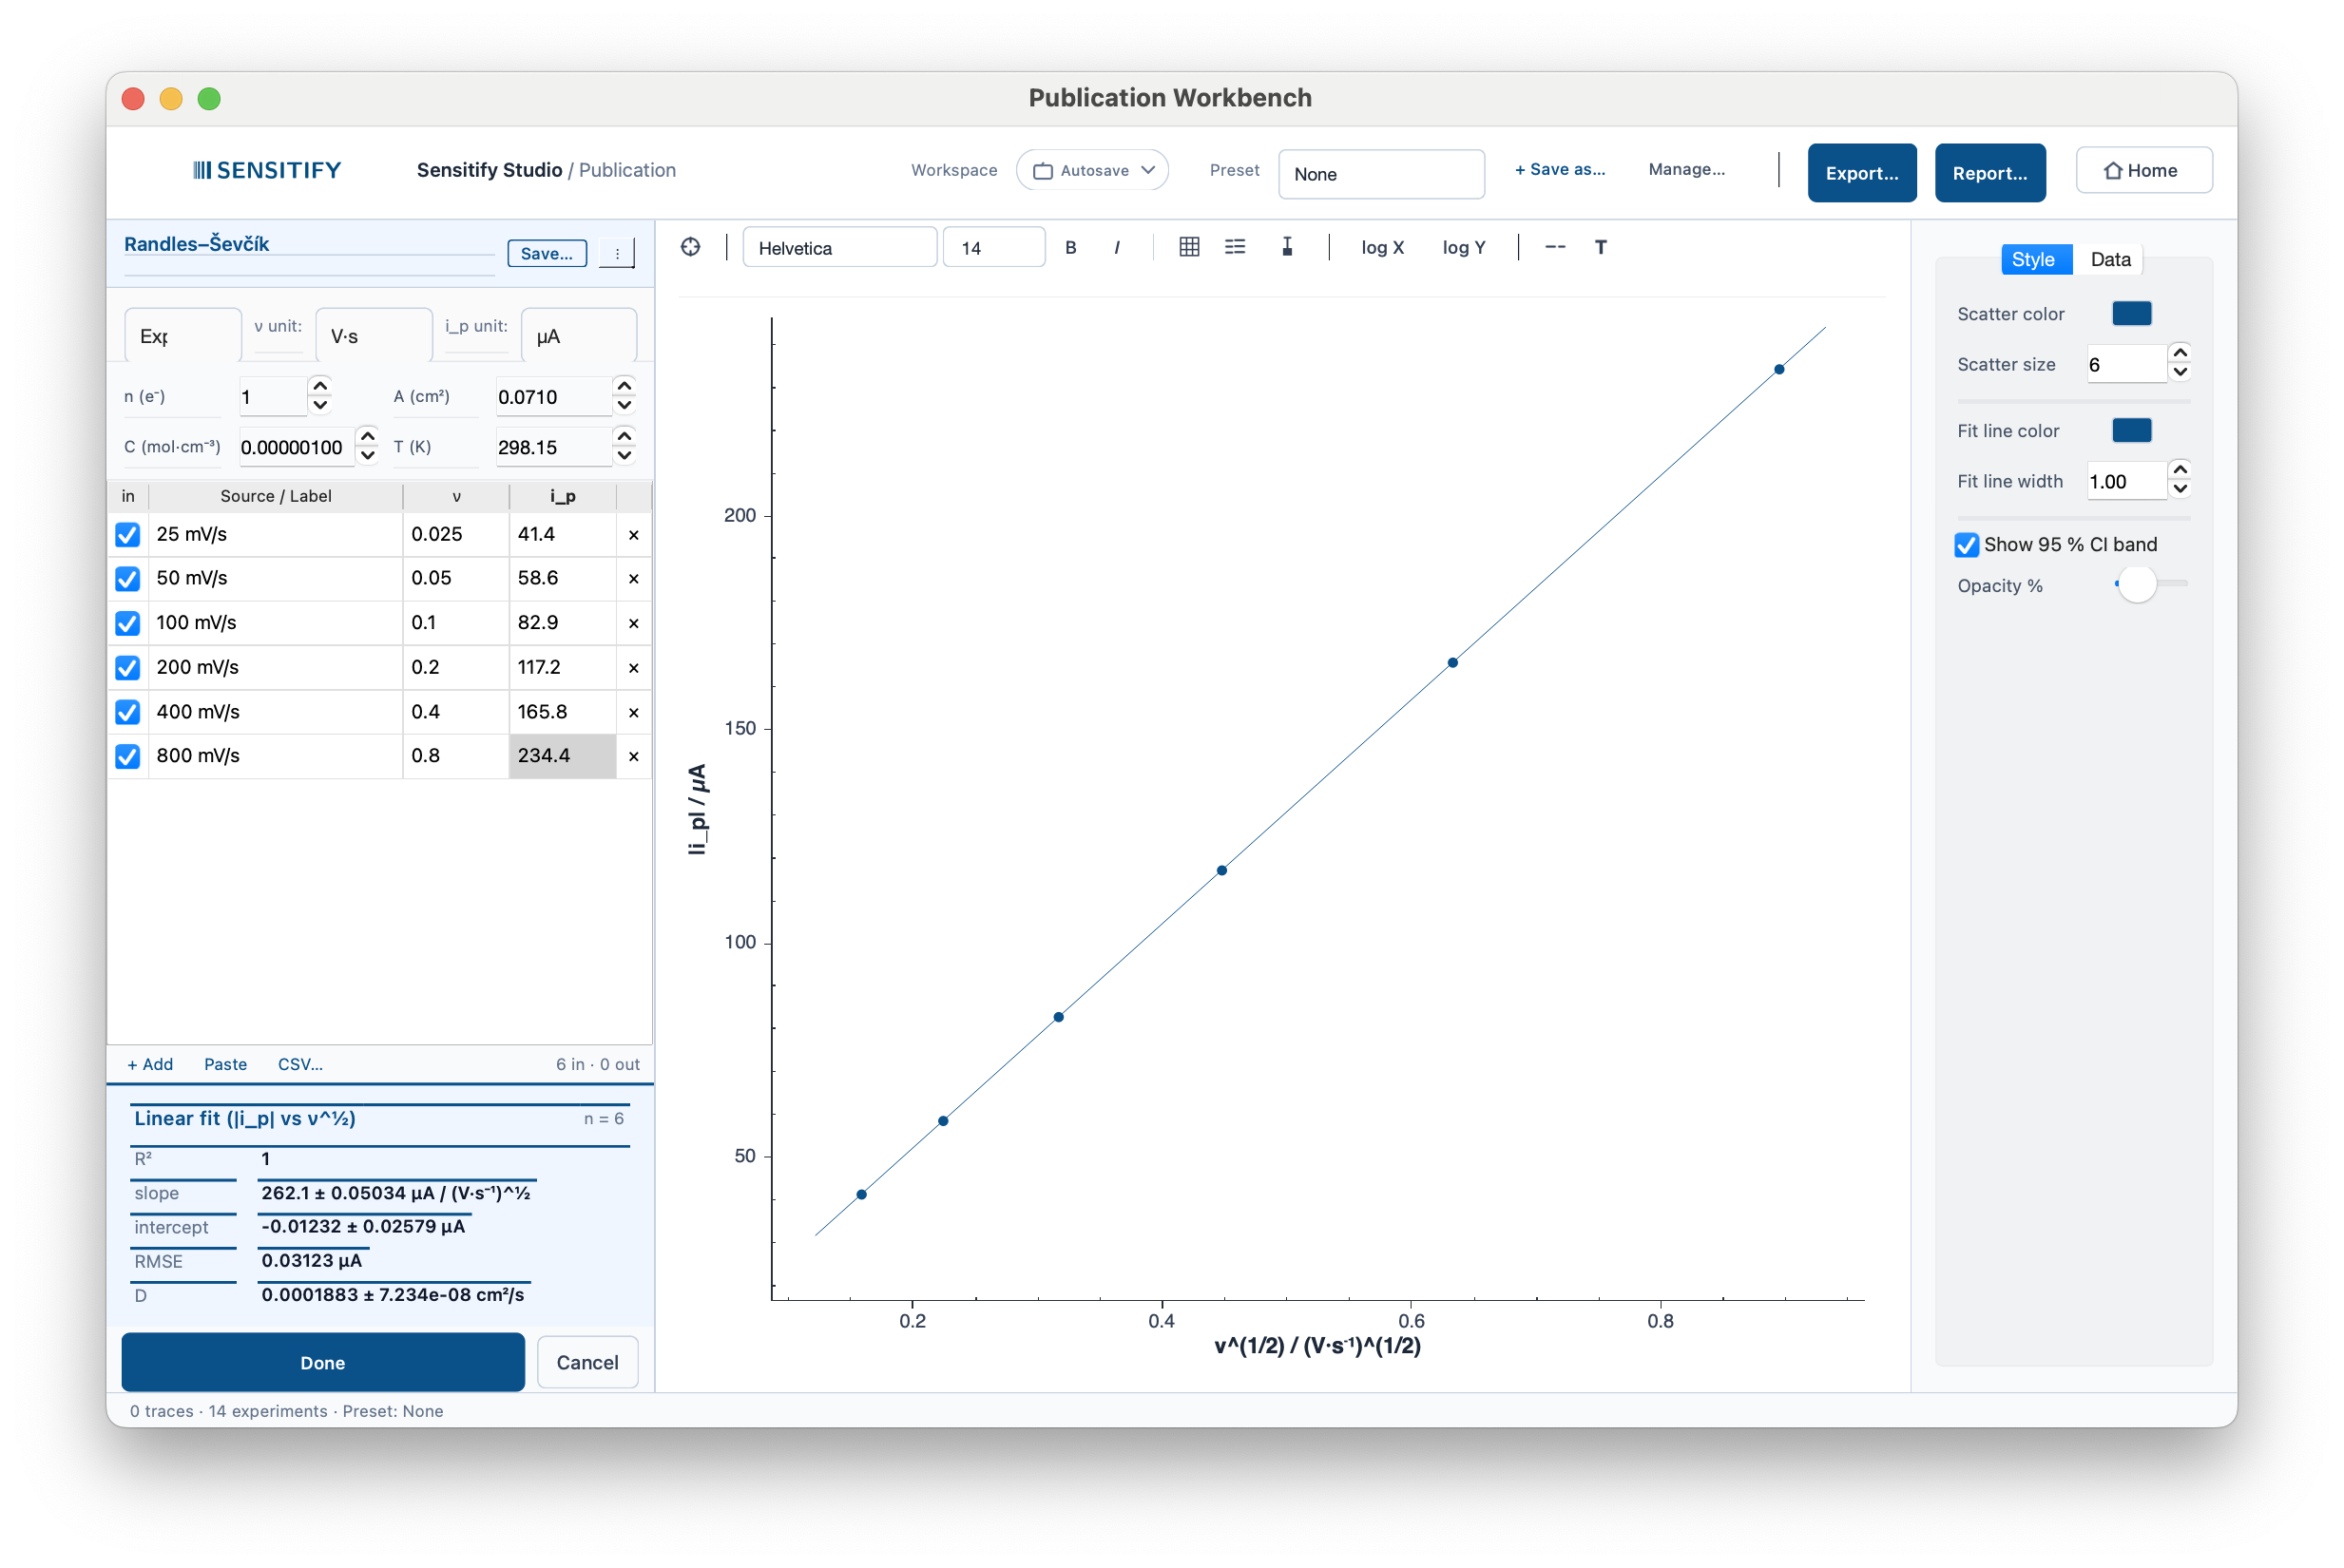
5 mM K₃[Fe(CN)₆] / 0.1 M KCl on a 3 mm GC electrode, six scan rates from 25 to 800 mV/s. The Workbench plots |i_p| against √ν and reports the diffusion coefficient: D ≈ 7.6 × 10⁻⁶ cm²/s, R² ≈ 0.9999.
Tafel
log|j| vs E plot with separate linear fits per branch. The slope of each branch is the Tafel slope β in mV / decade regardless of whether the user typed potential in V or mV; the intercept gives the exchange current density j₀.
The fit-window edges render as dotted vertical lines on the plot, green for the anodic branch and red for the cathodic, so you can see which points each fit uses. Change the window edges in the spinboxes to widen or narrow either window; β updates as you do. The cathodic branch can be disabled when the negative side is noisy. Rows where |j| = 0 are skipped (log undefined) with a yellow warning naming the rows.
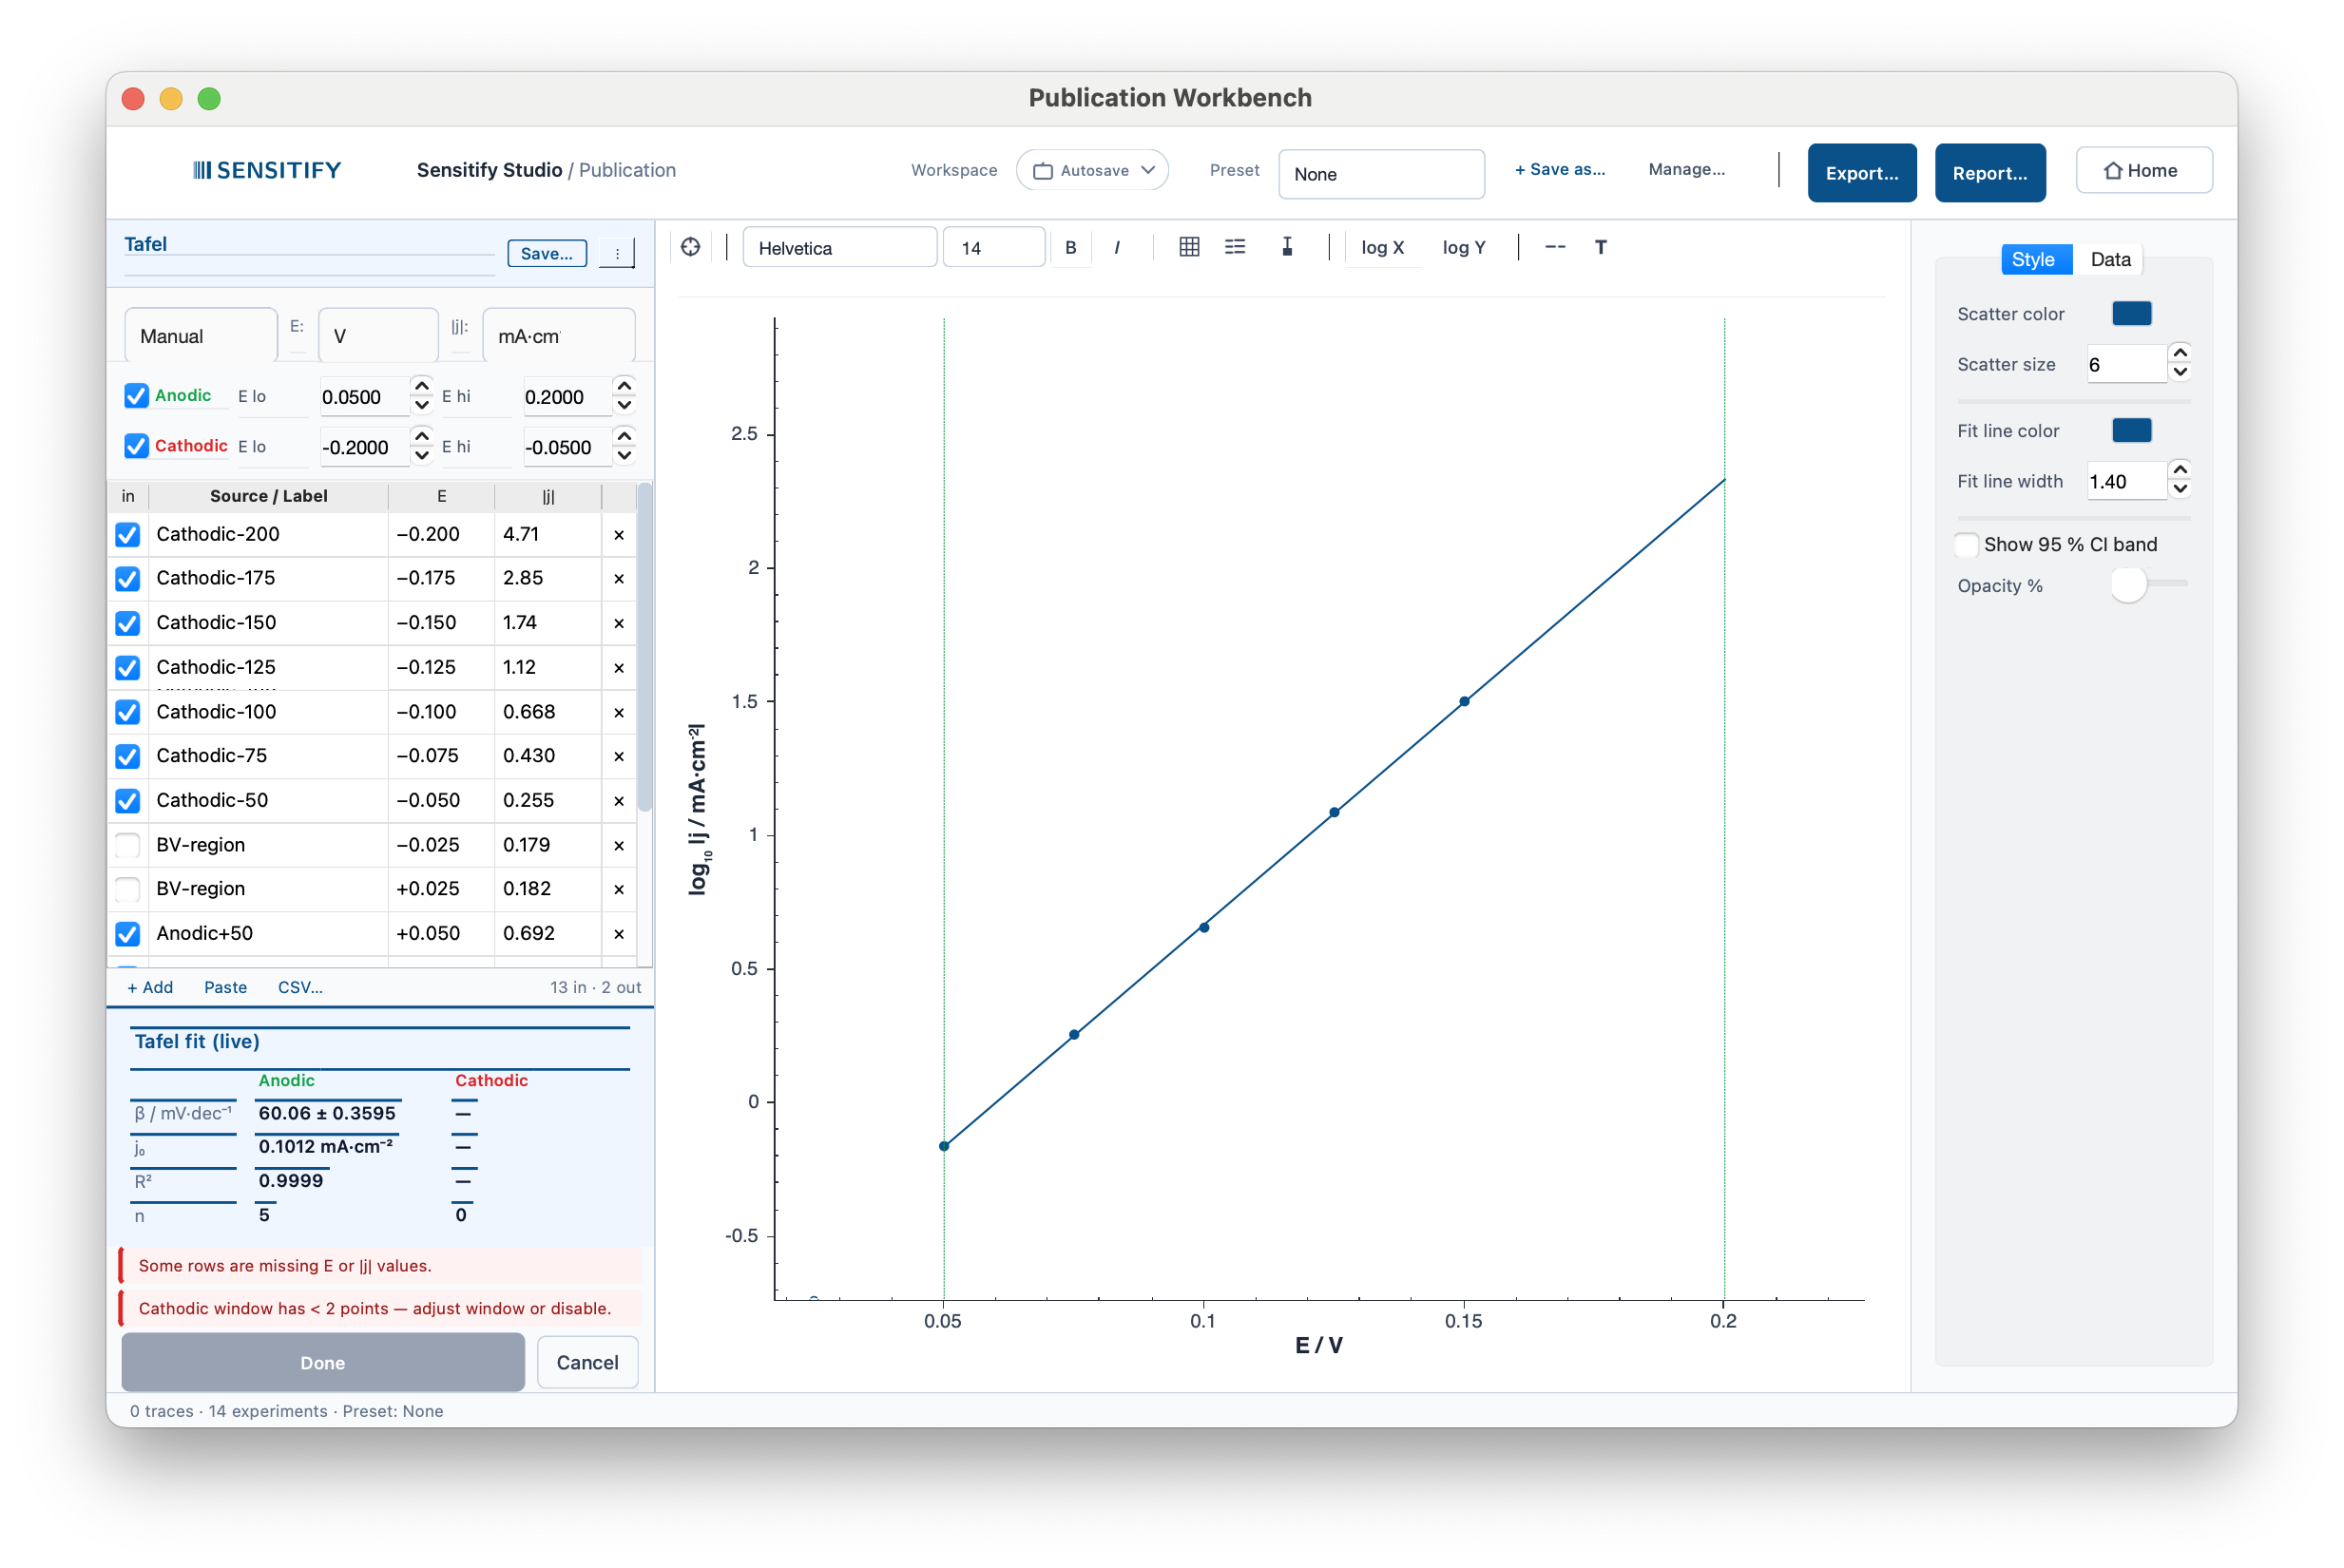
A mild-steel coupon in 1 M HCl, LSV around the corrosion potential. The two branches fit live: β_a ≈ 60 mV/dec (anodic dissolution), β_c ≈ 120 mV/dec (hydrogen evolution), j₀ ≈ 0.10 mA/cm² where the extrapolations meet. The green and red dotted lines are the anodic and cathodic fit-window edges.
Dose-response (4-PL)
Four-parameter logistic fit: y = bottom + (top − bottom) / (1 + (x / EC₅₀)^hill). Extracts EC₅₀ / IC₅₀, the dose at half-maximum response. The solver is Levenberg–Marquardt with initial guesses taken from the data.
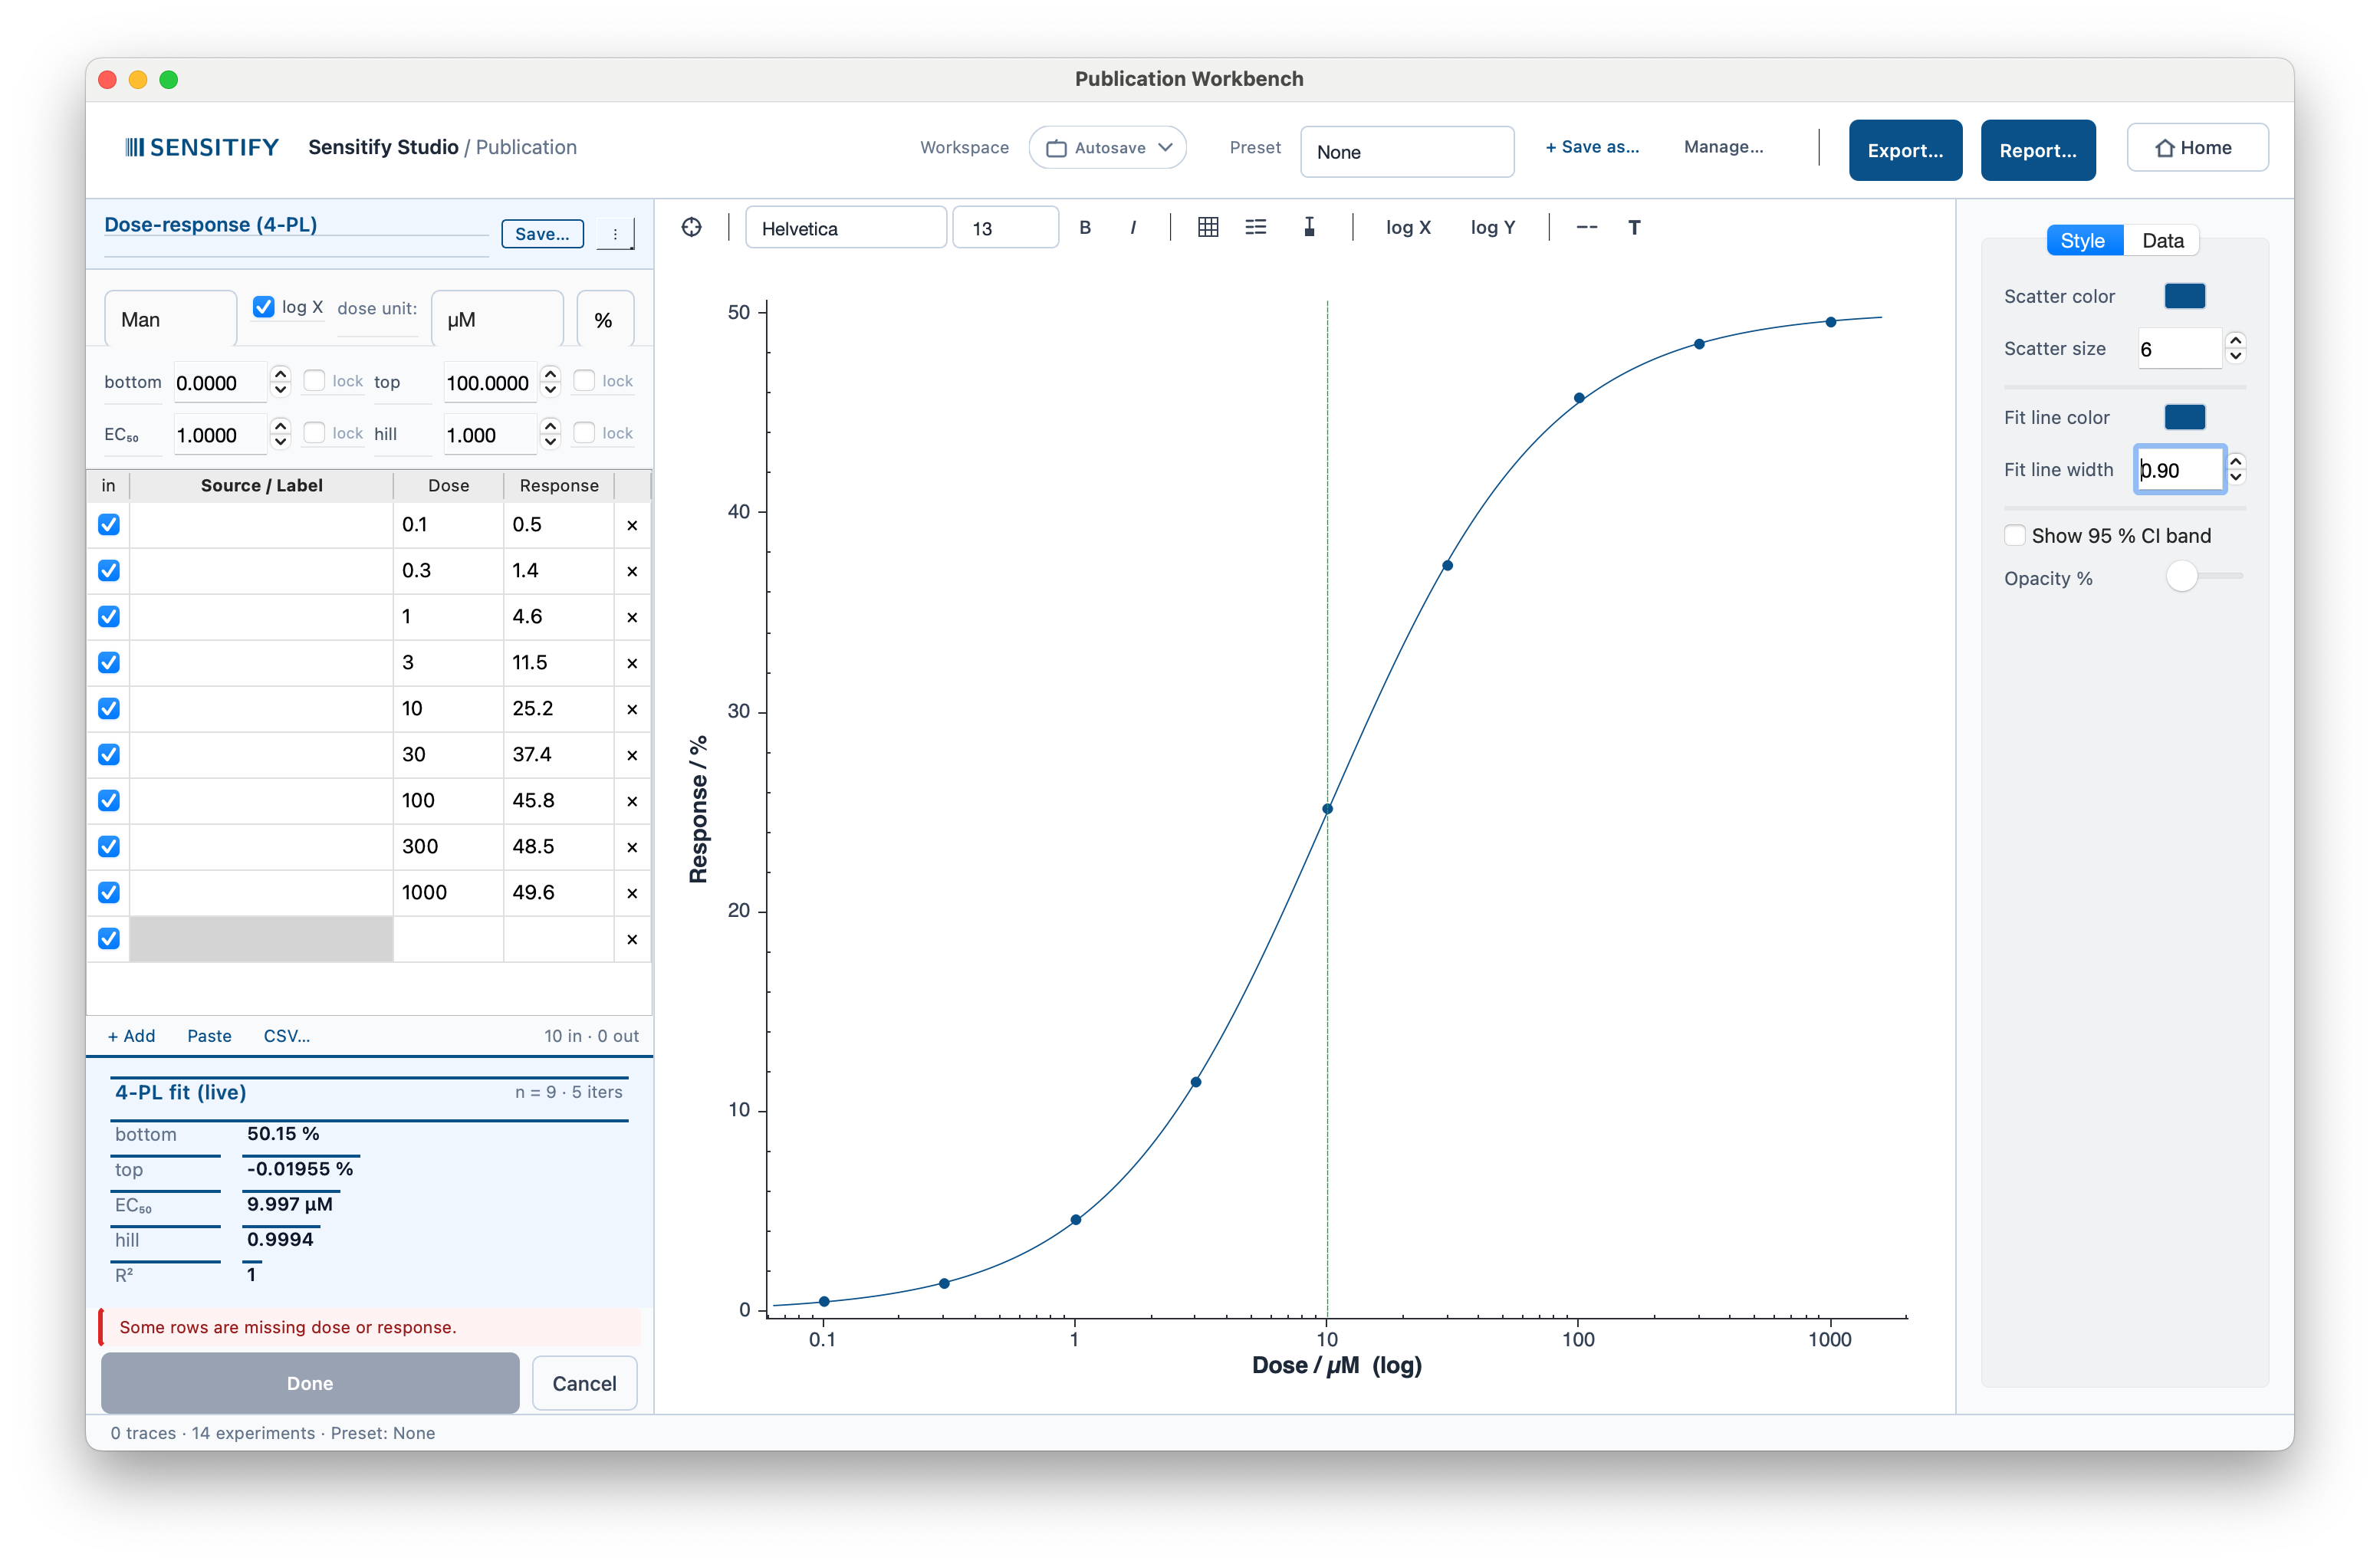
A 4-PL fit through nine dose / response points spanning five decades. The Workbench recovered EC₅₀ ≈ 10 µM, Hill slope = 1, top ≈ 50 (units in the response axis), R² = 0.9994. The vertical line marks EC₅₀.
Per-parameter locks let you fix bottom at 0 (when
background is known to be zero) or top at 100 % (full
saturation) and refit only the remaining parameters. Use this
when you need tighter EC₅₀ confidence intervals on
saturating-response assays. The log-X toggle flips the X
axis to logarithmic, rejects rows with dose ≤ 0, and samples
the fit curve in log space.
Box plot
Distribution per group with Q1 / median / Q3 boxes, 1.5 × IQR whiskers, optional jitter overlay, and optional outlier markers. A per-group descriptive table in the stats panel lists the group, n, median, IQR, and outlier count. Notched boxes are optional; non-overlapping notches indicate different medians at about 95 % confidence.
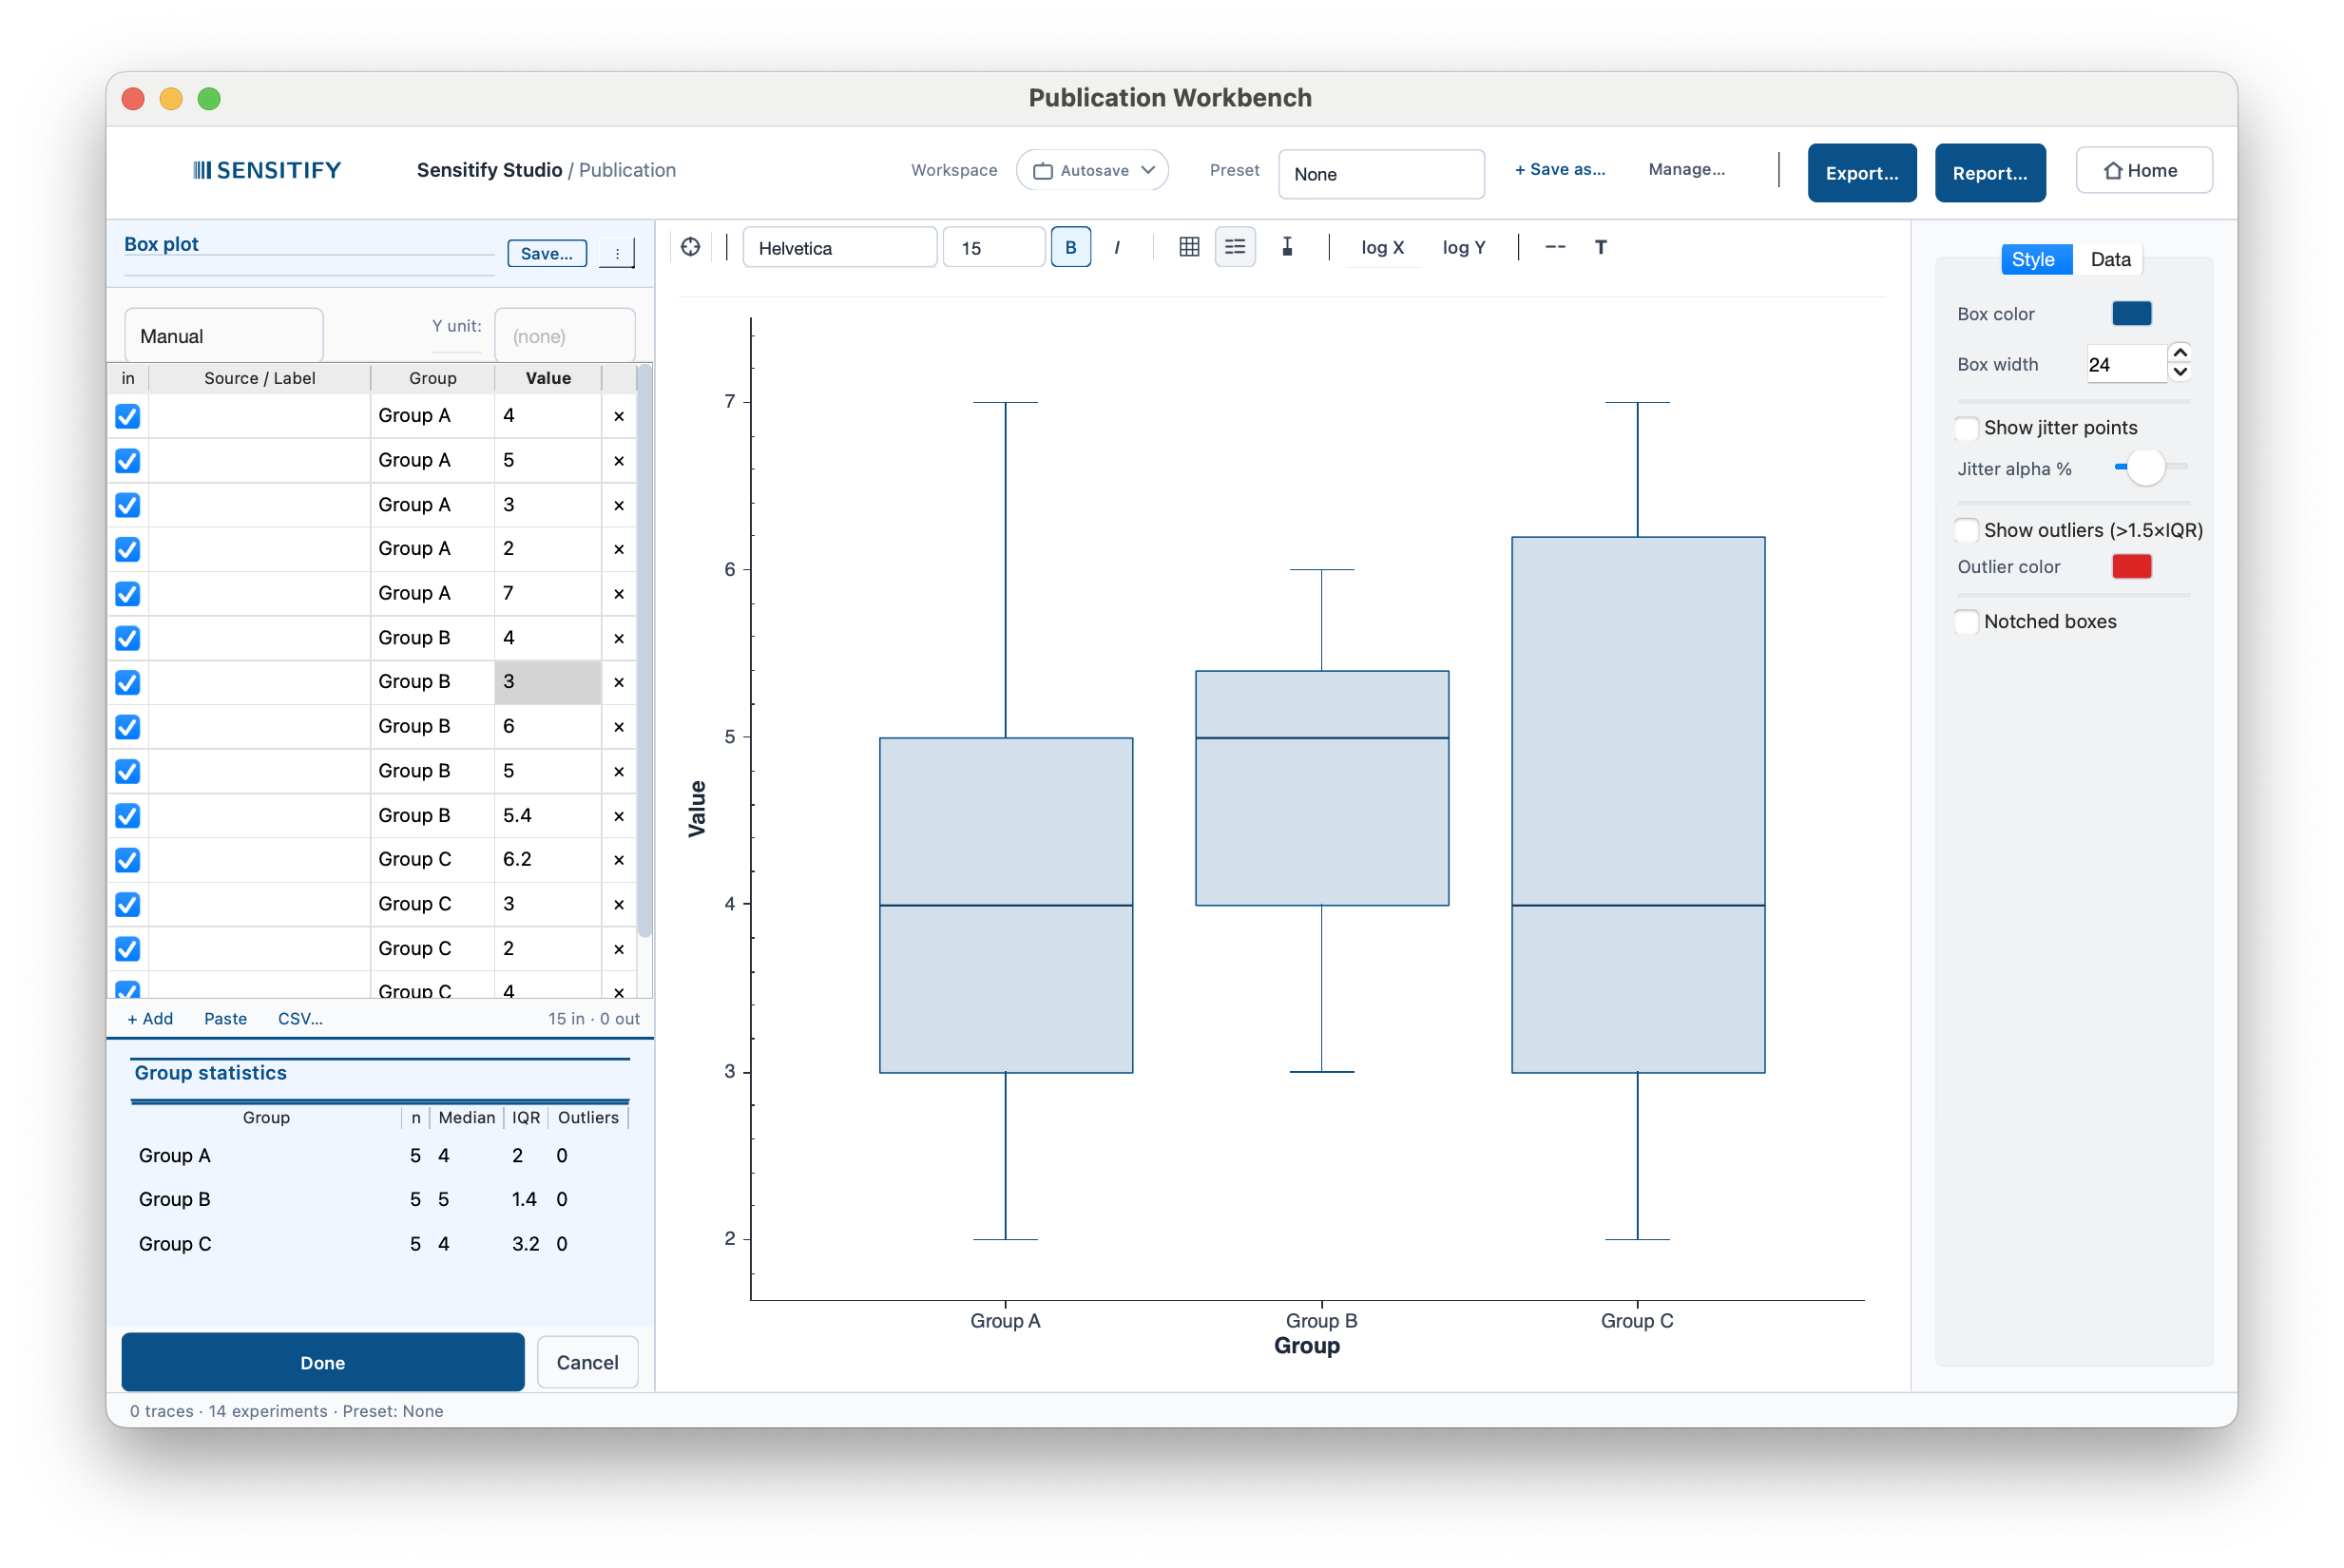
Three groups (n = 5 each), median values around 4–5, with IQRs of 1.4–3.2. The Style panel on the right exposes box width, jitter overlay opacity, the 1.5 × IQR outlier threshold, and the notched-boxes option.
Bar graph
The bar graph is a dialog with three tabs (Data, Style, Statistics), a preview pane, and named presets. You set up the groups, add significance brackets, and confirm.
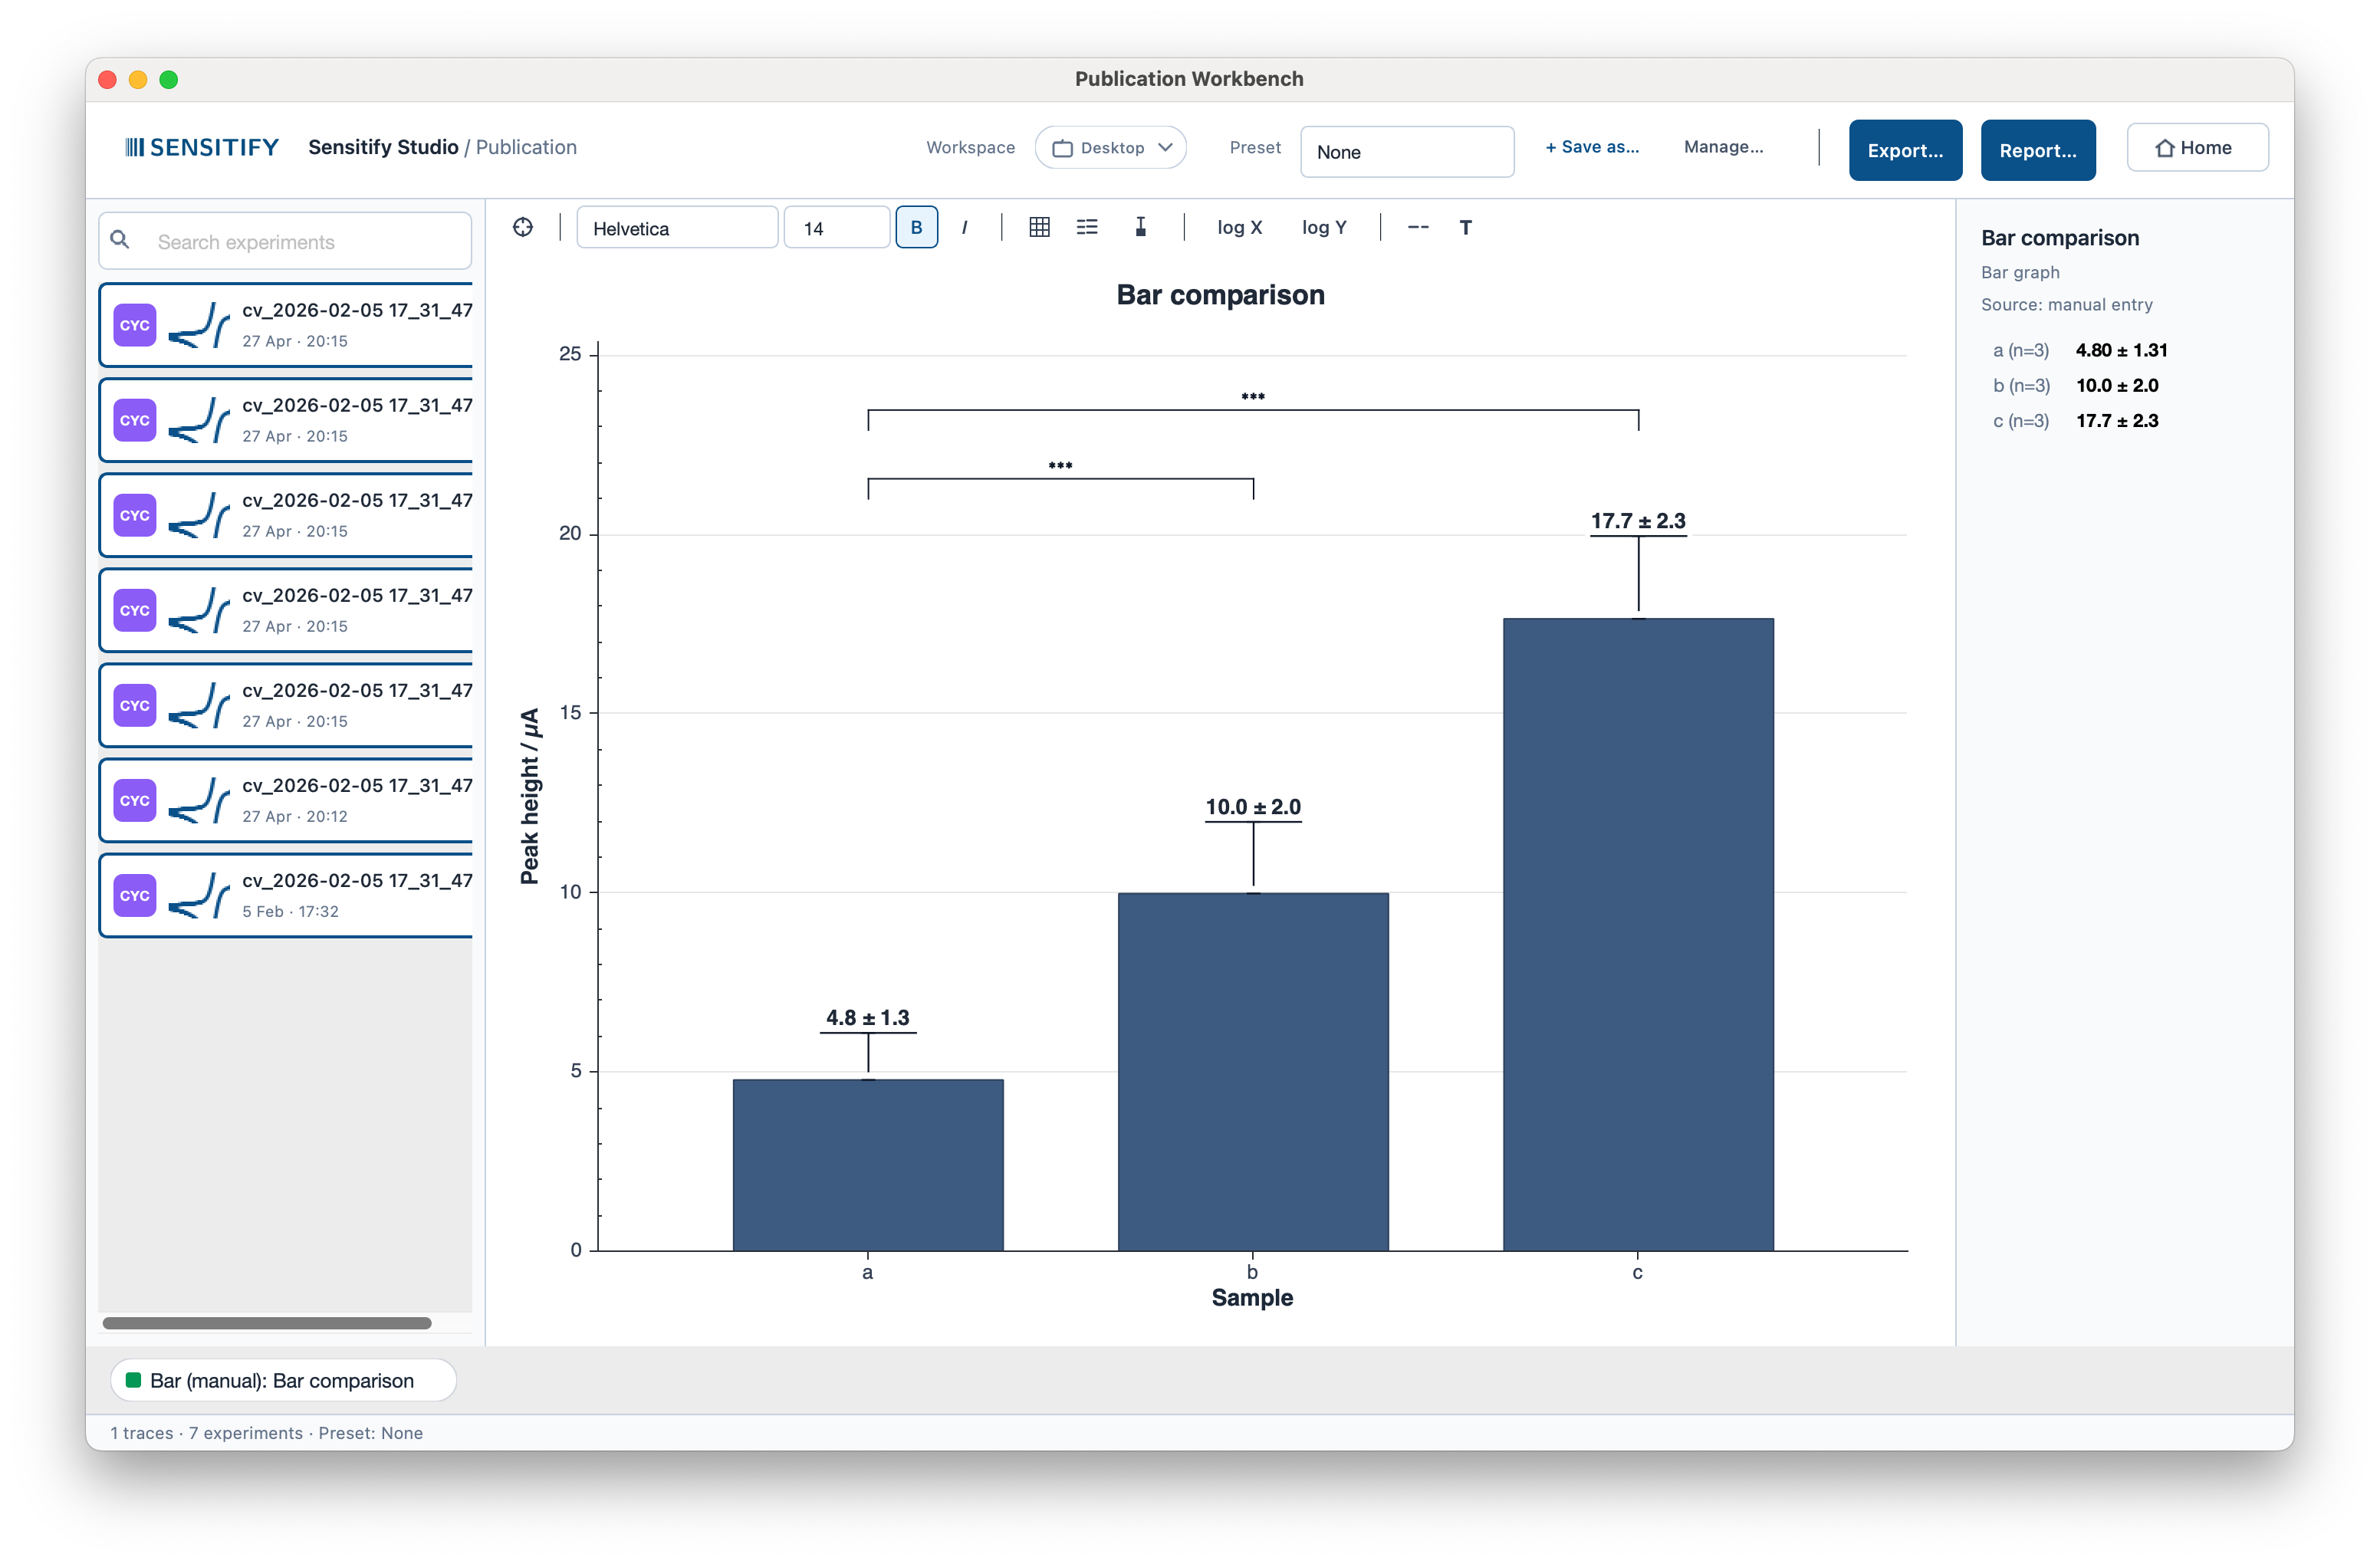
A bar comparison of three samples (n = 3 each) with means, standard deviations, and significance brackets. Values come from the experiments in the left rail or from manual entry. The two are kept separately, so switching between them does not lose what you typed.
Multi-panel and Blank canvas
Two layout containers are also available from the welcome grid:
- Multi-panel. Composite layout of several plots in a journal-style grid. Aligns axes, shares legends, and generates panel labels (a / b / c / …).
- Blank canvas. Free-form drag-and-drop figure builder for layouts none of the templates cover.
Publication presets
The preset selector at the top of the window switches between five built-in journal styles plus your own saved presets:
| Preset | Family | Title | Axis | Tick | Frame | Notes |
|---|---|---|---|---|---|---|
| None | Helvetica | 18 bold | 15 bold | 13 | 1.2 px | Sensitify house style. |
| Nature | Helvetica | 17 bold | 15 bold | 13 | 1.2 px | No top / right frame. Nature submission palette. |
| IEEE | Times New Roman | 17 bold | 15 bold | 13 | 1.3 px | All-frame box, greyscale palette. |
| ACS | Helvetica | 19 bold | 16 bold | 14 | 1.5 px | Tableau-style palette, ACS column widths. |
| Presentation | Arial | 26 bold | 21 bold | 18 | 2.2 px | Slide-deck sizes, ~50 % bigger. |
Switching the preset restyles every trace on the canvas. It also sets the default scatter and fit colours and line widths of the analysis modes, so a calibration curve and a Tafel plot in the same preset match. Colours you set by hand on individual traces are kept. Save as… stores the current state as a named preset. Manage… lists saved presets for renaming or deleting.
Plot and table
Every analysis mode re-runs the fit after each table edit; the plot and the statistics panel update together.
The plot and the table are linked. Click a point in the plot and the table scrolls to that row and highlights it. Click a row in the table and the matching point is ringed on the canvas. To exclude an outlier, right-click the point and choose Exclude from fit. The fit re-runs without it.
Workspaces
The Workspace chip in the header switches between saved project workspaces. Each workspace is a directory containing the experiment library plus the figure session for that project, paper, or experimental campaign. Autosave is the always-available scratchpad workspace.
Export and Report
- Export writes the current figure as PNG, PDF, or SVG. PDF for manuscript figures (vector), SVG for editable hand-off to a designer, PNG for slide decks and posters.
- Report assembles a multi-figure PDF from every figure in the current Workbench session.